Please bear with me.. this is the first time I have ever tried to write a pattern. It has not been tested either, so all feedback is greatly appreciated and will go to improving the pattern (not to mention my pattern writing skills)
Patons Jet- colour number 8 variegated reds x1
Spotlight Basics Entwine- colour number 231 variegated purples x1
Tools
Set of 4 9mm dpns for placenta
2 6mm dpns for icord umbilical cord
(I used a long circular with the work divided into three sections)
Tapestry needle
4 stitch markers
Fleece, hobby fill or waste yarn for stuffing
Worked in the round all in one piece
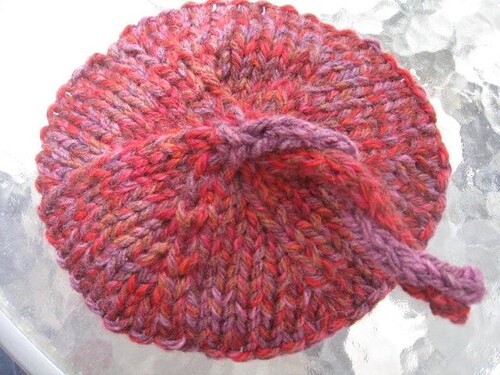
Base
co 3
R1 kfb each stitch. Arrange stitches on 3 dpns, using a marker after the first stitch to indicate the start of round [12 stitches]
R2 knit
R3 *k1 kfp k1 kfb k1* continue this pattern for the round [18 stitches]
R4 knit
R5 *k1 kfb k3 kfb k1* as above [24]
R6 knit
R7 *k1 kfb k5 kfb k1* continue [30]
Continue increasing 6 stitches in this pattern every second round until the placenta reaches the desired circumference
Purl 1 round for a defined edge
Top
R1 *knit to halfway along dpn k2tog pm knit to last two stitches on dpn k2tog* repeat on other two dpns
R2 knit
R3 *k to 2 stitches before marker k2tog sm k to 2 stitches k2tog* repeat
R4 knit
Continue decreasing this way until there are 12 stitches left.
Cut the two strands of yarn about 1 meter in length (longer if you want a longer umbilical cord)
Thread both strands of wool on a tapestry needle and run the needle through the stitches.
Remove 1 strand from the needle and thread the remaining one through a further 6 stitches.
Don't pull tightly yet as you will need to stuff the placenta.
Using desired fill, lightly stuff the placenta through the hole.
Picking up stitches either side of 1st strand, make an icord. Repeat for second icord. As I mentioned, the wools I used were two different sizes so to make the icord the same size I used 4 stitches for the red and 3 for the purple.
Once icord reaches desired length thread the remaining yarn through tapestry needle, run the yarn through the stitches, pull and secure.
Wrap icords around each other and sew together.
Please forward any feedback to support [at] strickerin [dot] [com]
This pattern is for personal use only. Please do not sell items made from this pattern.
Lisa, this looks great. I will have to give it a test run.
ReplyDeleteMel.
Well I can't offer any feedback because I have no idea about patterns, but it looks great :)
ReplyDeleteLooks great Lisa - I'll have a test of it tonight if you like, and send you an email tomorrow with feedback :)
ReplyDeleteLove the placenta! Sadly, I won't be making one of my own, I'm a real gumby when it comes to knitting :(
ReplyDeletenice work Lisa :)
ReplyDeletei haven't been by in a while.
ReplyDeletecongratulations on your new hungry caterpillar.
loving the knitted organs
HI-
ReplyDeleteI am a midwifery student doing an extra credit project on placenta implantation. I will be knitting a uterus and several placentas and would love to use your pattern. Can you tell me how big this placenta ends up? Thank you so much for your ingenious knit!
-Vicki
Ηi theгe! Τhis post couldn't be written any better! Reading this post reminds me of my good old room mate! He always kept talking about this. I will forward this article to him. Pretty sure he will have a good read. Many thanks for sharing!
ReplyDeleteMy weblog ; Lego Lord Of The Rings Orc Forge